No Products in the Cart
How to Make a 3D Winter Snowflake from Q-Tips Step-by-Step
|
Time to read 2 min
Never Struggle Planning Activities Again
Easy to use activity booklets for your troop meeting.|
Time to read 2 min
Winter is here, and that means it's snowflake season! Snowflakes are so cool – they're like tiny stars made of ice!
And guess what? We will make our own snowflakes today, but not with ice! We'll use Q-tips to create amazing 3D Winter Snowflakes you can decorate and hang up. It's super easy and super fun! So grab your supplies, and let's get crafting!
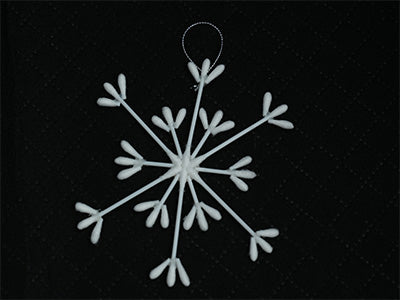
Step #1
Cut a small circle from your cardboard. The smaller the circle, the easier to conceal with the Q-tips. This circle will form the central backing of your snowflake, providing a stable foundation.
Step #2
Take six whole Q-tips. Glue them into the cardboard circle, arranging them as follows: one pointing straight up, one straight down, and two on each side (left and right). Think of it like a plus sign with Q-tips.
Step #3
To add dimension, Cut three Q-tips in half. You will use these to make parts of 3D Winter Snowflakes of different lengths.
Step #4
Glue these halves between the whole Q-tips you placed in the previous step. This will add depth and complexity to your snowflake.
Step #5
Now, cut only the ends off several Q-tips (about a quarter inch).
*See some of the extra tips at end of this post for other ways to decorate your snowflake
Step #6
Glue two of these short Q-tip pieces to each end of your 3D winter snowflake – both the longer ends (the original whole Q-tips) and the shorter ends (the halved Q-tips). This adds delicate points and sparkle.
Step #7
Cut a piece of decorative thread or string. Tie a loop and glue it to the top back of the cardboard circle. This will allow you to hang your finished 3D winter snowflake.
Tips and Variations:
Skip the instructions, watch this video and make your own 3D winter snowflakes!
Get ready for some winter crafting fun! These Winter Crafts Kits provide everything you need to create 24 dazzling 3D snowflake ornaments. With foam layers, stickers, pom-poms, rhinestones, and satin cords, the possibilities are endless. No instructions are needed – just unleash your creativity and design unique snowflakes in a variety of colors and shapes.
While making a 3D Winter Snowflake is a fantastic project, we have plenty of other engaging craft ideas to keep your troop busy and creative. Here are a few more fun and educational activities to try out:
Enjoy the process of creating these beautiful 3D winter snowflakes and bring a touch of winter wonderland into your home!
Enjoy every minute being a leader and continue to inspire your girls!


