No Products in the Cart
How To Make a Witch Hat Filled with Chocolate
|
Time to read 2 min
Never Struggle Planning Activities Again
Easy to use activity booklets for your troop meeting.|
Time to read 2 min
I get commissions for purchases made through links on this post.
Looking for a fun and spooky craft to make this Halloween? This DIY witch hat is the perfect project! You can use it as a party favor, a decoration for your home, or a special gift filled with treats. This guide will walk you through the steps, from building the hat to decorating it with spooky flair.
Black cardboard
Black felt (optional, for a more realistic texture)
Scissors
Hot glue gun
Pencil and ruler
Round object for tracing (like a plate or a small bowl)
Chocolates or other candies
Orange satin ribbon
Decorative items (e.g., plastic spiders, googly eyes, decorative stones)
Step 1:
First, you'll need to create the cone shape for the hat.
Use a pencil and ruler to mark a tall triangle shape on the black cardboard. The height of the triangle will be the height of your hat. A 6-inch height is a good starting point, but you can adjust this depending on the size of your chocolates.
Step 2:
Carefully cut out the triangle using your scissors.
Step 3:
Roll the cardboard into a cone shape. Secure the seam with hot glue. Make sure the cone is sturdy and well-sealed.
Step 4:
Next, you'll create the brim of the hat.
Place your cone on another piece of black cardboard and trace the base. This will give you a circle the exact size of the bottom of your cone.
Now, find a larger round object, like a plate. Center the smaller circle you just drew inside the larger one and trace the bigger circle. This will be the outer edge of your brim.
Step 5:
Cut out the larger circle, and then cut out the smaller circle from the center. You should be left with a doughnut-like ring.
Step 6:
Now it's time to bring the two pieces together.
Fill the cone with your chocolates and candies.
Step 7:
Apply hot glue around the bottom edge of the cone.
Carefully place the cone into the center of the brim. Press down firmly to make sure it's secure.
Step 8:
This is where you can get creative and make the hat your own!
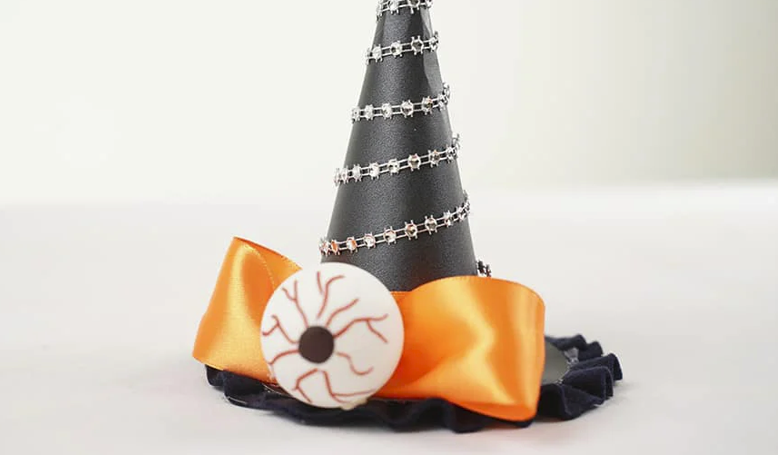
To add a more realistic texture, cut a few 2-inch-wide strips of black felt. Apply a little hot glue to one end and gently pinch it to create a ruffle. Glue these ruffled strips around the base of the hat, just above the brim.
Step 9:
Use orange satin ribbon to create a band around the hat. Glue one end of the ribbon to the hat and wrap it around. Tie a bow and attach it to the front.
Step 10:
Add some final details! You can glue a decorative eye in the middle of the bow, or use other Halloween-themed items like spiders or decorative stones.
Step 11:
Completed Craft!
Remember, this is your witch hat creation, so have fun with it! Feel free to experiment with different colors, materials, and decorations to make a witch hat that's uniquely yours.
This short video will walk you through all the steps to make your own witch hat filled with chocolate.
Get into the autumn spirit with these other fun and festive fall crafts! From spooky Halloween projects to cozy Thanksgiving decorations, you're sure to find a new favorite way to celebrate the season.
Enjoy every minute being a leader and continue to inspire your girls!


