No Products in the Cart
How to Make a Dream Catcher Step-by-Step
|
Time to read 3 min
Never Struggle Planning Activities Again
Easy to use activity booklets for your troop meeting.|
Time to read 3 min
Are you looking for a craft that’s not only fun and visually appealing but also carries a touch of history and meaning? Look no further than the paper plate dream catcher! This easy-to-make project is perfect for Girl Scouts of all ages and provides a wonderful opportunity to discuss cultural traditions while unleashing their creativity. So gather your supplies, get ready to weave some magic, and let’s learn how to make a paper plate dream catcher!
Before we get our hands crafty, let's take a moment to appreciate the origins of the dream catcher. Traditionally, dream catchers are handcrafted objects rooted in Native American cultures, particularly the Ojibwe tribe. Legend has it that the night air is filled with both good and bad dreams. The dream catcher, hung above the sleeping area, acts as a filter. Its web catches the bad dreams, holding them until the first rays of the morning sun cause them to vanish. The good dreams, however, gently slide down the feathers to the sleeper below.
While we’ll be using a paper plate for our base, understanding the traditional significance adds a layer of respect and learning to this beautiful craft. It’s a great opportunity to discuss cultural appreciation and the importance of learning about different traditions with your Girl Scout troop.
Before you start, please remember to encourage your Girl Scouts to explore different color combinations and embellishments to make their dream catchers truly unique. This craft can also be a starting point for discussions about Native American culture and the symbolism of the dream catcher. Remember to approach this topic with sensitivity and respect, perhaps researching age-appropriate resources beforehand.
Paper plate: A pack of standard white paper plates will work perfectly.
Scalpel: For carefully cutting out the center of the paper plate. A craft scalpel offers more precision for intricate cuts, but safety scissors are essential for younger Girl Scouts with close supervision.
Feathers: A variety pack of feathers in different colors will add a beautiful and traditional touch.
Beads: A mix of pink, blue, purple, and any other colors your Girl Scouts love! Look for pearl beads and other fun shapes.
Strong Thread: Colored thread is suggested, but any sturdy thread or colorful yarn will work for weaving the web.
Glue: A good quality craft glue will help secure the thread and decorations.
Felt decorative flowers: Felt in various colors and small wooden flowers can add extra decorative flair to the center and bottom of the dream catcher.
Hole punch: For creating evenly spaced holes around the inner circle of the paper plate.
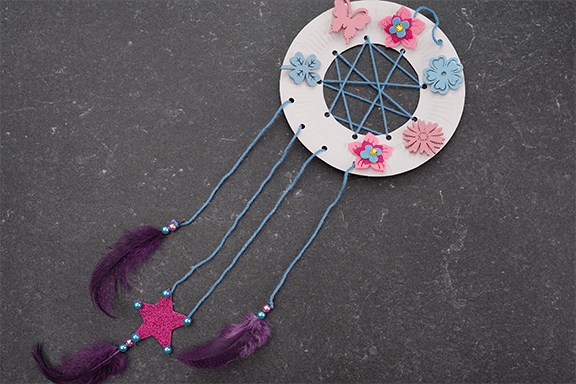
Step 1 - Prepare the Paper Plate
Carefully draw a circle in the center of the paper plate, leaving a border of about 1-2 inches. For older Girl Scouts with more dexterity, they can try cutting the circle freehand. Using a craft scalpel (with adult supervision!) or scissors, cut out the center circle, leaving a ring. This ring will be the frame of your dream catcher.
Step 2 - Punch the Holes
Using the hole punch, create evenly spaced holes around the inner edge of the paper plate ring. Aim for an odd number of holes (around 7-11) to make starting the weaving pattern easier.
Step 3 - Weave the Dream Web
Take your blue thread or yarn and tie one end securely to one of the holes. Begin knitting the thread across the circle.
Step 4 - Punch Holes for top and bottom
Then cut a few holes on the bottom and two holes on the top.
Step 5 - Hang String
Put some thread on the top so you can hang the decorations and leave some longer threads in the bottom holes for the feathers.
Step 6 - Add Decoration
Put one pink and one blue pearl on every feather and tie the feather with the thread. You can also glue it but it’s totally up to you.
Step 6 Continued - Add Decoration
I used a star and then glued pearls on every corner and feathers on the bottom. Just play a little; you can use many different color combinations.
Step 7 - Decorate the Plate
Use stickers, crayons, or felt decorations to design the paper plate.
Step 8 - Complete
Now you have a completed dream catcher! Hang it near your bed and let it work its magic, catching any bad dreams while allowing the good ones to drift down.
Do you need more dream catcher ideas? Check out all these amazing ideas on my Dream Catcher Craft Ideas For Kids Pinterest Board.
Enjoy every minute being a leader and continue to inspire your girls!


