No Products in the Cart
How to Make a Paper Shamrock Man Step-by-Step
|
Time to read 2 min
Never Struggle Planning Activities Again
Easy to use activity booklets for your troop meeting.|
Time to read 2 min
If you’re anything like me, right now you’re belatedly taking down your Valentine’s Day decor and wondering, what’s next? It’s not quite time for Easter, but there’s something in between… Saint Patrick’s Day, of course!
As you know, crafting is a great way to spend time with your troop and help them build their creativity. As you prepare yourself to make all the green food and wear all the green clothes, this is an awesome time to sit down with your girls and create some new Shamrock-themed decorations with a festive flair! This is a great chance to show your troop members the ropes on how to create in an accessible, fun way and make a paper shamrock man.
Learn how to make a Paper Shamrock Man. You will do this mud painting craft with a few simple supplies. You can learn through directions and pictures and a short video at end of post showing how to do it. Let’s get started!
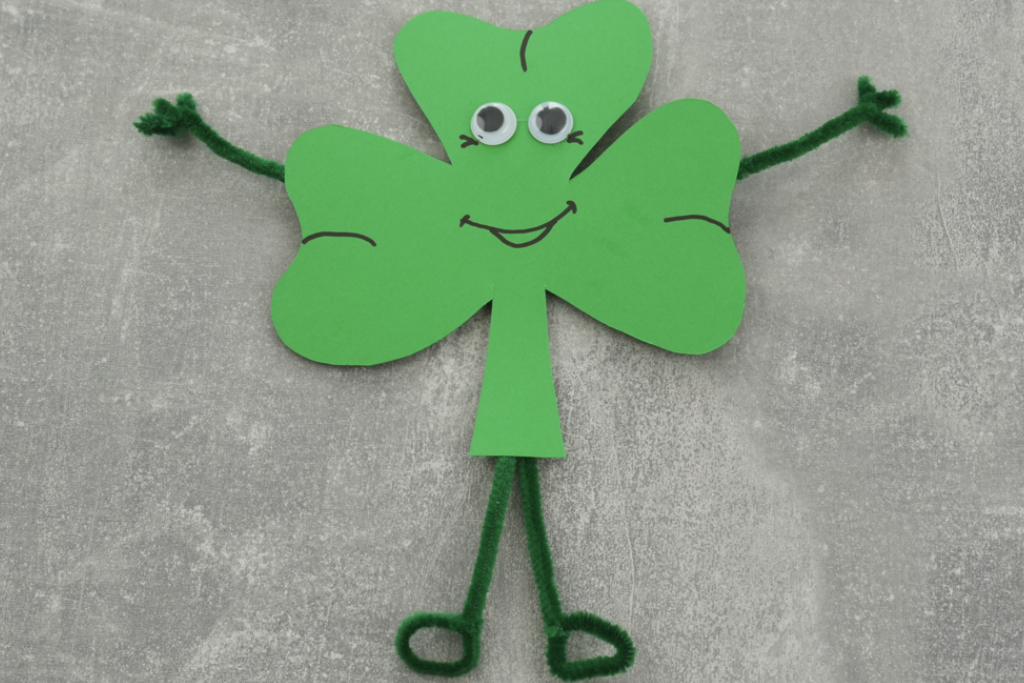
STEP 1: Draw Clover
Using a pencil, draw a clover shape on the cardboard.
STEP 2: Cut out Shamrock
Once you are satisfied with how it looks, carefully cut it out with a pair of scissors.
STEP 3: Create the legs
Create the legs and the arms. Take one pipe cleaner, fold it in half and shape the legs on the bottom as you can see on the video. Then take another pipe cleaner and cut two small pieces. Take one whole pipe cleaner and add the small pieces on the two ends to create the arms.
STEP 4: Assemble the paper shamrock man
Now it’s time to assemble the shamrock man. First glue the eyes. Then make some small lines around with the black marker to make it look more realistic. You can also draw small lines on the corner of the eyes and some smiling mouth appropriate with the size of the project.
STEP 5: Add legs to paper shamrock man
At the end glue the arms and legs onto the Shamrock man.
Leprechaun Shamrock Man: Add a hat and beard made from construction paper or felt to transform your Shamrock Man into a mischievous leprechaun.
Dancing Shamrock Man: Attach a string to the top of your Shamrock Man and hang it up so it can dance in the breeze.
Shamrock Man Family: Create a family of Shamrock Men with different sizes and expressions.
Do you need more St Patrick's day ideas? Check out all these amazing ideas on my St Patrick Ideas For Kids Pinterest Board.
In conclusion, creating a paper shamrock man is a fun and simple craft project that can be enjoyed by all ages. By following the step-by-step instructions outlined above, you can easily assemble this festive and charming decoration. Let your creativity shine as you personalize your shamrock man with details such as eyes and a smiling mouth.
Once completed, proudly display your creation or share it with others to spread a little luck and cheer. Enjoy the process of crafting your paper shamrock man and have a happy St. Patrick's Day celebration!
Enjoy every minute being a leader and continue to inspire your girls!


