No Products in the Cart
3 Easy to Make Pumpkin Crafts for Your Troops Fall Event
|
Time to read 5 min
Never Struggle Planning Activities Again
Easy to use activity booklets for your troop meeting.|
Time to read 5 min
I get commissions for purchases made through links on this post.
As the leaves turn and the air gets crisp, our thoughts turn to all things autumn. While Halloween might get all the attention, the fun doesn’t stop there. Pumpkins are a fantastic centerpiece for fall, and a perfect theme for some easy and engaging troop crafts that can last all the way through Thanksgiving.
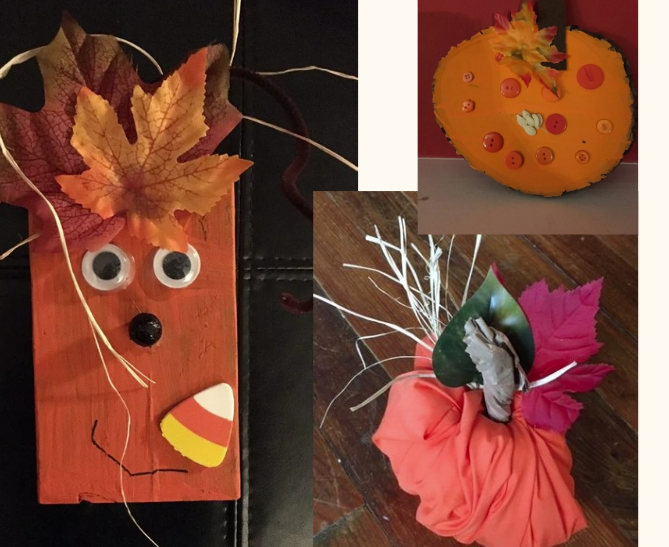
I've got three simple, fun pumpkin crafts that are perfect for a troop meeting or a special fall event. The best part? None of these are the typical jack-o'-lanterns, so they can be made early in the season and still be a beautiful decoration for the rest of November.
This craft is great for younger and older girls alike. It’s a bit like building a tiny, rustic scarecrow, but with a pumpkin twist. The wooden block gives it a sturdy, charming feel, and the girls can personalize it to reflect their own style.
Wood Block: A 2x4 or similar size cut into small blocks works perfectly. You can often find these pre-cut at craft stores, or you can have them cut at a home improvement store.
Acrylic Paint: A bottle of orange paint is the main color, and a little black for details.
Paint Brushes: A variety of sizes works well for different details.
Wiggly Eyes: Small or medium sizes are perfect for giving the pumpkins personality.
Black Marker: A fine-tip permanent marker for drawing on a mouth.
Craft Glue: Tacky glue or a similar strong craft glue works best for securing the decorations.
Black Pom Poms: These make great noses.
Raffia Ribbon: A great option for adding a rustic touch at the top.
Assorted Craft Leaves: Small, fake leaves in fall colors.
Foam Decorations (Optional): Small fall-themed shapes like candy corn, acorns, or bats can be fun additions.
Paint the Base: Start by having each girl paint their wood block completely orange. Make sure to cover all sides for a clean look. Depending on the paint, you might need two coats. Set them aside to dry completely. This is a great time to have a quick snack or sing a song while the paint dries.
Add the Face: Once the blocks are dry to the touch, it’s time to bring them to life! Using glue, the girls can attach two wiggly eyes and a black pom pom for the nose. After the glue is set, use the black marker to draw on a smile or a silly mouth.
Decorate! This is where the girls can get creative. They can glue on a small foam decoration like a candy corn or a little acorn.
Finish the Top: To create the pumpkin's “stem” and top, the girls can glue a few craft leaves and a small piece of raffia ribbon to the top of the wood block. Tie the raffia into a simple bow or just a knot for a rustic look.
Toilet Paper Roll: One for each girl.
Cotton Batting or Stuffing: A bag of this will go a long way.
Orange Fabric: About a 24x24 inch square piece of orange fabric for each girl. A solid color or a subtle pattern will work.
Raffia Ribbon: For a nice bow at the top.
Green and Red Craft Leaves: Small fabric or foam leaves to create the pumpkin’s top.
Popsicle Sticks: These act as the "stem" and a place to glue the leaves.
Brown Kraft Paper: A small piece for each girl to roll into a stem.
Craft Glue: A good, reliable glue to secure all the pieces.
Prepare the Pumpkin Base: Have each girl lay their large square of orange fabric flat. Place the toilet paper roll in the center and then stuff the empty middle of the roll and around it with cotton batting.
Gather the Fabric: Have the girls carefully grab all four corners of the fabric, pulling it up and around the toilet paper roll like a sack. Push the fabric edges into the opening at the top of the roll. This creates the pumpkin's shape.
Add the Leaves: Now for the details! Glue a red and green craft leaf to the end of a Popsicle stick.
Create the Stem: Take a small piece of brown kraft paper and roll it tightly into a small log shape to create the stem.
Assemble the Top: Carefully push the Popsicle stick (with the leaves) and the brown kraft paper stem into the fabric-filled opening at the top of the toilet paper roll. The fabric should hold it securely, but you can add a dab of glue if needed.
Finishing Touch: Tie a piece of raffia ribbon into a small bow and glue it to the top of the pumpkin, around the stem and leaves. This adds the perfect rustic charm.
Tree Stump Slices: These are inch-thick circles cut from a tree branch or log. You can often find them at craft stores or online.
Orange Paint: A bottle of acrylic paint in a bright or harvest orange.
Paint Brushes: Assorted sizes.
Craft Glue: Tacky glue is perfect for this.
Orange and Red Buttons: A mix of sizes and shades.
Pumpkin Seeds: Dried and clean pumpkin seeds.
Craft Leaves: Small, colorful fabric or foam leaves.
Brown Foam Sheet: For cutting out the pumpkin stems.
Anything Else to Decorate: Glitter, glitter glue, sequins—the sky's the limit!
Paint the Pumpkin Base: Lay out the tree stump slices and have the girls paint the top surface completely orange. The natural grain of the wood will still show through, which is a lovely effect. Let them dry completely.
Add the Stem: While the paint is drying, you can cut small stem shapes from the brown foam sheet. Once the pumpkin is dry, have the girls glue the foam stem to the top.
Decorate! This is the best part! Put out all the decorative supplies and let the girls create their own unique pumpkin face or design. They can use orange and red buttons for eyes or a mouth, glue on pumpkin seeds in a pattern, or add small craft leaves.
Personalize It: Encourage them to use glitter or other small craft supplies to add a personal touch. There are no wrong answers here—it’s all about creativity!
If you’re looking for a different kind of pumpkin craft, something that's cute and requires less individual supply gathering, you can also try a kit like this pumpkin wreath kit. It’s a great option for a fall event, and the girls can make a beautiful decoration for their parents or someone else they love.
These crafts are a fun and festive way to celebrate the fall season with your troop. They also make a great activity to include in a fall-themed event you might be planning, like an Apple Fun Day, a Backwards Party, a Spud Party, or even a Minute to Win It challenge.
Enjoy every minute being a leader and continue to inspire your girls!


